
Resurfacing vs. Extending an Existing Concrete Slab
An old concrete slab that’s showing its age doesn’t automatically need to be broken out and repoured — that’s often the most expensive option, and it’s not always the right one. Depending on what’s actually wrong with the slab (cosmetic wear versus structural failure) and whether you need more square footage or just a better surface, resurfacing or extending can solve the problem for a fraction of a full replacement cost.
Resurfacing: Fixing the Surface, Not the Structure
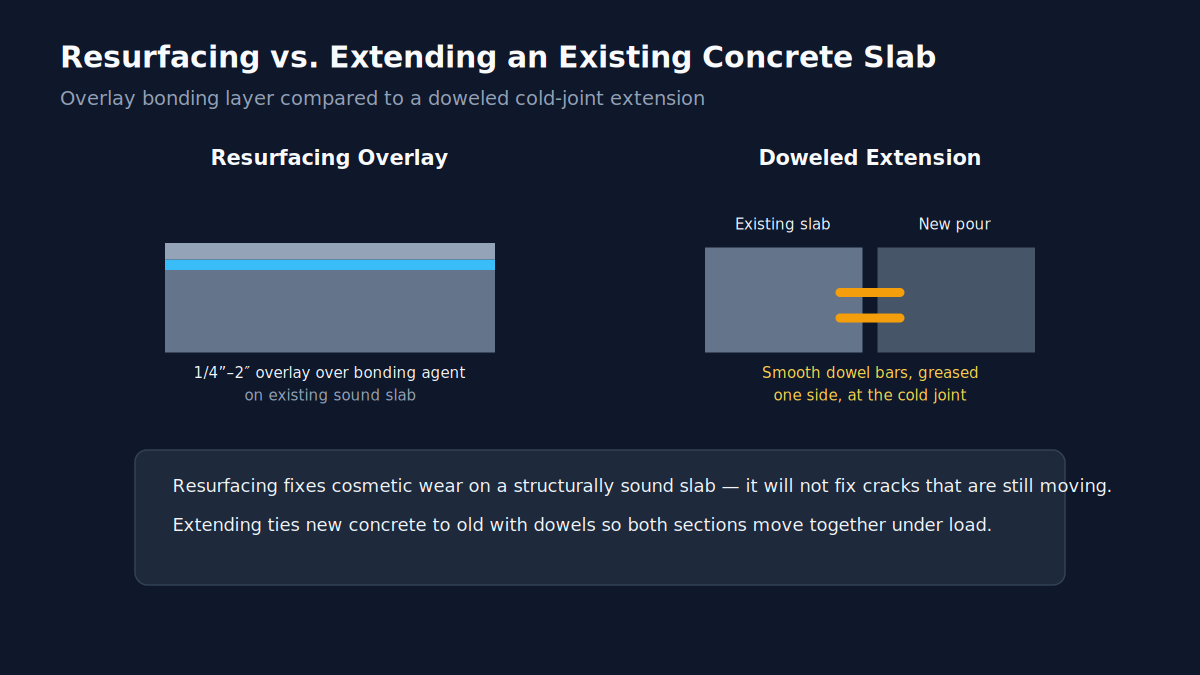
A resurfacing overlay is a thin layer — typically 1/4 inch to 2 inches — of polymer-modified concrete or specialized overlay material bonded to the top of an existing slab with a primer or bonding agent. It’s a cosmetic and light-wear solution: it restores a smooth, even surface, covers minor surface cracking and discoloration, and can be finished with a new texture, stamped pattern, or color that the original slab never had.
What resurfacing does not do is fix a structural problem. If the existing slab has active settlement cracking, is heaving, or has sections that are structurally unsound, an overlay bonded on top will telegraph that same movement right back through to the new surface within a season or two. Resurfacing only makes sense over a slab that’s structurally sound but cosmetically tired — surface spalling, minor scaling, faded color, or an uneven but stable surface.
What Resurfacing Typically Costs and Involves
Resurfacing generally costs meaningfully less than a full tear-out and repour, since it skips demolition, haul-off, and new base preparation entirely — you’re paying for surface prep (pressure washing, patching, sometimes light grinding), the bonding agent, and the overlay material and finish work. The process usually includes cleaning and degreasing the existing surface, patching any significant surface defects, applying the bonding primer, then placing and finishing the overlay, followed by the same curing requirements as new concrete, plus a waiting period before any sealer goes on — see our sealer guide for that timing.
Extending: Adding Square Footage to an Existing Slab
Extending a slab — pouring new concrete directly adjacent to an existing slab to increase its size — is a different problem with a different solution: a properly detailed cold joint. New concrete doesn’t chemically bond to old, cured concrete the way a monolithic pour bonds to itself, so an extension relies on mechanical connection instead. The standard approach uses smooth dowel bars, greased on one side so they can slide slightly as the two sections expand and contract independently, set into drilled holes in the existing slab edge and extending into the new pour. This keeps both sections moving together vertically under load (so you don’t get a trip-hazard step forming at the joint) while still allowing each section to expand and contract on its own.
Matching Thickness, Reinforcement, and Control Joint Layout
The most common mistake in slab extensions isn’t the dowel connection itself — it’s mismatching the new section’s specification to the old one. If the original slab is 4 inches thick with wire mesh and the extension is poured at the same 4 inches but with no reinforcement at all (or vice versa), the two sections will behave differently under load and temperature swings, which shows up as uneven cracking patterns right at the joint over time. Before pouring an extension, confirm the original slab’s approximate thickness (a core sample or an exposed edge can tell you this) and match reinforcement type using our rebar calculator or reinforcement guide, and plan control joints in the new section that align sensibly with the existing slab’s joint pattern rather than creating an unrelated grid.
Permits for Resurfacing and Extending
A resurfacing overlay on an existing slab in the same footprint typically doesn’t require a new permit, since it doesn’t change the structure’s footprint or grading. Extending a slab, on the other hand, is functionally a new pour and is treated that way for permit purposes in most jurisdictions — especially if the extension adds impervious surface area or changes drainage. Check our permit guide before scheduling an extension pour, since a setback or drainage issue on the added footprint is much easier to resolve on paper than after concrete is in the ground.
What Extending Typically Costs and Involves
Cost-wise, an extension is priced essentially like a new slab pour for the added square footage — use our concrete slab cost calculator for the new section’s material and labor cost — plus the additional labor for drilling and epoxying dowel bars into the existing slab edge. Matching the new concrete’s thickness, reinforcement, and ideally its finish and color to the existing slab takes some care; a driveway extension poured a different thickness or without matching reinforcement than the original section is a common source of uneven wear and cracking right at the new joint.
A Third Option: Partial Repair Plus Resurfacing
Sometimes a slab is almost entirely sound with one isolated problem area — a single settled corner, a localized spall from a dropped heavy object, or a small area of scaling near a downspout. In these cases, the practical answer is often a hybrid: repair the isolated defect first (mudjacking a settled corner, patching a spall down to sound concrete), let that repair cure fully, and then resurface the whole slab as a final step so the patch and the original surface end up visually consistent. Trying to resurface directly over an unrepaired defect just telegraphs the same problem through the new overlay, so sequencing matters here as much as the individual repair techniques.
When You Actually Need a Full Repour Instead
Neither resurfacing nor extending is a fix for a slab that’s structurally failed. Signs it’s time for demolition and a fresh pour rather than a repair:
- Multiple wide, actively moving cracks, or sections of slab that are visibly settled relative to each other
- Extensive deep spalling or scaling that goes well below the surface, not just a cosmetic top layer
- A sub-base problem (poor drainage, expansive soil, inadequate original compaction) that caused the damage in the first place — patching the surface without fixing what’s underneath just delays the same failure
- A slab that’s significantly undersized for your needs, where extending would create an odd, awkward shape rather than a clean addition
Our demolition and removal cost calculator estimates the cost of that full tear-out option if it turns out to be the right call.
Decision Framework
| Situation | Best Option |
|---|---|
| Surface wear, fading, minor scaling; structure is sound | Resurfacing |
| Need more square footage adjacent to a sound existing slab | Extending |
| Active settlement, wide moving cracks, or sub-base failure | Full removal and repour |
| Slab is sound but you want a different look (stamped, colored) | Resurfacing |
A Note on DIY vs. Hiring Out
Small-scale resurfacing (a single patio or small walkway) is within reach for a careful DIYer, but bonding overlay material is less forgiving than a standard pour — surface prep and primer application matter enormously to whether the overlay actually stays bonded, and a failed bond means redoing the whole job. Extending a slab with dowels involves precise drilling and epoxy work that’s easy to get wrong on a first attempt. For anything beyond a small, low-stakes area, getting at least one contractor quote for comparison is worth it even if you ultimately DIY — see our broader guide to what’s realistic to DIY for where these particular tasks fall on that spectrum.
Getting a Realistic Cost Comparison Before You Decide
Because resurfacing, extending, and full replacement have such different cost structures, it’s worth getting actual numbers for your specific slab before choosing a path based on assumptions. Use the concrete slab cost calculator to price a full repour of your existing footprint as a baseline, the removal calculator to add demolition cost to that baseline, and get at least one resurfacing-specific quote from a contractor who does overlay work regularly — the labor and material cost structure for overlays doesn’t map cleanly onto standard per-square-foot new-pour pricing, so a general concrete contractor’s ballpark estimate isn’t always a reliable guide.
Frequently Asked Questions
How long does a resurfacing overlay last?
A well-installed overlay on a sound base can last 10 to 20+ years, though it depends heavily on traffic, climate, and whether it’s properly sealed and maintained — similar in principle to how a sealer’s lifespan depends on the product and exposure.
Will an extended slab section ever match the original perfectly?
Not perfectly — even with matched concrete mix and finish, subtle color and texture differences are common, and they tend to become less noticeable as both sections weather over the following year or two.
Can you resurface a slab that already has a sealer on it?
The existing sealer typically needs to be stripped or ground off first, since overlay material won’t bond well to a sealed, non-porous surface — this is part of why surface prep is such a large share of resurfacing labor cost.
Does resurfacing or extending affect a home’s resale value the same way a full new slab does?
A well-executed resurfacing or extension generally reads just as well to a buyer as a full repour, since the visible result is what matters most — but keep records of the work (photos, contractor invoices, permit documentation for an extension) in case a future buyer or inspector asks about the slab’s history.
Calculate Your Concrete Project Budget
Use our comprehensive concrete slab cost calculator to get a complete line-item breakdown of materials, labor, reinforcement, and base preparation.
Launch Concrete Slab Calculator →