
Concrete Slab Cracks: What Causes Them and How to Actually Prevent Them
Nearly every concrete slab develops some cracking eventually — concrete is a rigid material that shrinks slightly as it cures, and it’s going to crack somewhere. The real question isn’t “will my slab crack” but “is this crack normal, and did I do anything to make it worse than it needed to be.” Most cracks fall into one of three categories, and each one has a specific, preventable cause.
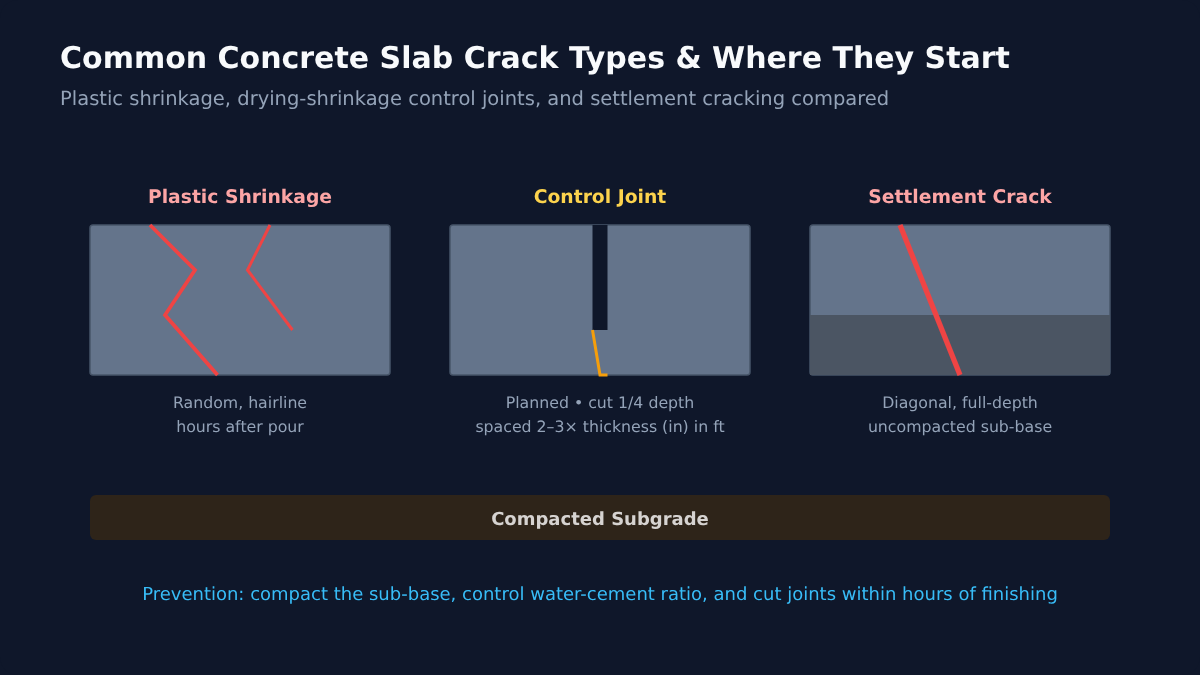
Type 1: Plastic Shrinkage Cracks
These show up within the first few hours after the pour, while the concrete is still plastic (unhardened). They’re usually thin, random, and shallow — more of a cosmetic surface issue than a structural one. They happen when water evaporates from the surface faster than bleed water can rise up to replace it, which shrinks the top layer while the concrete underneath hasn’t set yet. Hot, dry, or windy pour days are the classic trigger, which is why our guide to picking the best time of year to pour flags high-evaporation conditions as something to plan around.
Prevention: Dampen the sub-base before pouring so it doesn’t pull moisture out of the fresh concrete, avoid pouring in direct sun with high wind, use an evaporation retardant on hot days, and start curing (covering/wetting) as soon as the surface can tolerate it without marring the finish.
Type 2: Control Joints (Planned, Not a Problem)
This one isn’t really a “crack” at all — it’s a designed weak point. Concrete is going to crack somewhere as it shrinks during curing, so contractors cut (or tool) straight joints into the slab at regular intervals to control exactly where that happens, hiding the crack inside a clean groove instead of letting it wander randomly across the surface. Per our own calculation methodology, the standard rule of thumb is spacing control joints at roughly 2 to 3 times the slab’s thickness in inches, expressed in feet — so a 4-inch slab gets joints every 8 to 10 feet.
Prevention: Joints need to be cut within a fairly narrow window — typically 4 to 12 hours after finishing (1 to 4 hours with an early-entry saw), before shrinkage cracking has a chance to happen on its own. Cut too early and you can tear the surface (raveling); cut too late and the slab has already cracked wherever it wanted to, not where you planned. Depth should be about a quarter of the slab thickness so the joint actually creates a controlled weak plane.
Type 3: Settlement Cracks (The One Worth Worrying About)
These are diagonal, often wider than a hairline, and go through the full depth of the slab. They happen when the ground underneath isn’t uniformly supporting the concrete — a soft spot, an uncompacted fill area, erosion under an edge, or a tree root that decayed after the pour. Unlike shrinkage cracks, settlement cracks can keep growing or cause one side of the crack to sit visibly lower than the other.
Prevention: This is entirely a sub-base problem, which means it’s entirely preventable before the pour. Compact the excavated subgrade in lifts with a plate compactor, use a uniform, well-graded gravel base (see our gravel base calculator for sizing it correctly), and don’t pour over loose fill, organic material, or a freshly backfilled trench that hasn’t had time to settle. Our yard prep checklist walks through this step by step.
Other Common Causes Worth Knowing
- Too much water in the mix. Adding extra water to make concrete easier to pour is one of the most common DIY mistakes — it weakens the finished slab and increases shrinkage. Follow the water-cement ratio on the bag or ready-mix ticket, not “what looks easier to work with.”
- Reinforcement placed wrong (or skipped). Rebar and wire mesh don’t stop shrinkage cracking, but they do hold cracks tightly together once they happen, which limits how much they can widen or shift. Steel that’s placed too low (or sitting on the ground instead of on chairs) does nothing useful. Our rebar calculator and reinforcement guide cover proper placement.
- Overloading before full cure. Driving or building on a slab before it’s reached adequate strength (see our curing time guide) can crack it under load it would otherwise easily handle once fully cured.
- Freeze-thaw cycling without air entrainment. In climates with hard winters, water that gets into the concrete’s pores and freezes expands and can spall or crack the surface over repeated cycles. Air-entrained mixes (with 5–7% entrained air by volume) relieve that pressure internally and are standard for exterior flatwork in freeze-thaw regions.
Reading a Crack Like a Contractor Would
Before deciding whether to ignore, seal, or fully repair a crack, take a few minutes to actually study it the way a contractor would on a walkthrough. Run a fingernail across it — hairline cracks you can barely feel are almost always shrinkage-related and low priority. Check both sides of the crack with a straightedge or level; if one side sits noticeably proud of the other, that’s a settlement signature, not shrinkage. Look at where it’s located: cracks radiating from the corner of a slab, or running between two interior corners (like around a drain or a post base), often trace back to stress concentration at that geometry rather than a sub-base problem, and are common even on well-built slabs.
Should You Worry About a Crack You Already Have?
Most hairline shrinkage cracks are cosmetic and don’t need structural repair — they can be filled with a flexible crack sealant to keep water out and stop them from growing, which is mostly about preventing freeze-thaw damage inside the crack over time. Watch for these warning signs that a crack is more than cosmetic:
- One side of the crack is visibly higher or lower than the other (settlement, not shrinkage)
- The crack is wider than about 1/4 inch or keeps getting wider over successive seasons
- Multiple cracks are radiating from one point, or a section of slab is visibly rocking underfoot
If any of those apply, that’s a sub-base or structural issue rather than normal shrinkage, and it’s worth getting a contractor to look at it before deciding between a patch, a resurfacing overlay, or a full removal and repour.
DIY Crack Repair: What’s Realistic and What Isn’t
For hairline and narrow shrinkage cracks (under about 1/8 inch), a self-leveling polyurethane crack sealant is a genuinely reasonable DIY job — clean the crack of debris, apply per the product’s instructions, and it flexes with seasonal movement instead of cracking again next to itself. For wider cracks or anything showing settlement, a rigid epoxy injection can restore some structural continuity, but it needs the crack to be stable (not actively moving) or the repair will just crack again in a new spot.
What’s not a realistic DIY fix: a slab section that’s visibly settled, tilted, or heaving. That’s a sub-base problem, and patching the surface crack without addressing what’s happening underneath just delays the same failure. Options at that point are typically mudjacking or polyurethane foam lifting to re-level the section, or, in worse cases, cutting out and repouring that portion of the slab.
How Weather and Season Interact With Cracking
Cracking risk isn’t evenly distributed across the year. Hot-weather pours are more prone to plastic shrinkage cracking from fast evaporation, while pours that don’t get adequate protection in cold weather can suffer internal freeze damage that shows up later as unexpected surface scaling or cracking, even though the slab looked fine when it was poured. Our guide to timing your pour covers the specific temperature thresholds (ACI 306 for cold, ACI 305 for hot) that trigger extra precautions — and skipping those precautions is one of the more preventable causes of early cracking we see referenced in industry repair data.
Does Slab Thickness Affect Cracking?
A thicker slab isn’t automatically less crack-prone — it’s more about matching thickness to the intended load. A 4-inch slab used as a patio rarely has cracking issues from load, but that same 4-inch slab used as a driveway (carrying vehicle weight it wasn’t designed for) is far more likely to crack under repeated loading than a properly specified 5-inch, rebar-reinforced driveway slab. See our guide on how thick a slab should be for load-matched thickness recommendations by application.
Frequently Asked Questions
Is it normal for a brand-new driveway to crack within the first year?
A few hairline shrinkage cracks in the first year, especially near control joints or edges, are common and not usually a defect. Wide, moving, or rapidly spreading cracks in year one are worth a warranty call to whoever poured it.
Can I just fill a crack with new concrete?
Plain concrete patch doesn’t bond well to an existing crack edge and tends to pop back out. A proper repair uses a flexible polyurethane or epoxy crack filler for hairline cracks, or a bonding-agent-backed patch for wider structural cracks.
Do control joints ever fail to work?
Yes — if they’re spaced too far apart for the slab thickness, cut too shallow, or cut too late after the pour, the slab can crack somewhere other than at the joint. That’s a design and timing issue more than a materials one.
Should I be worried about cracks near where rebar was placed?
Not inherently — rebar doesn’t prevent shrinkage cracking, it just holds any crack that does form tightly together. A hairline crack that happens to cross over a rebar grid is doing exactly what the reinforcement is designed to let it do.
Calculate Your Concrete Project Budget
Use our comprehensive concrete slab cost calculator to get a complete line-item breakdown of materials, labor, reinforcement, and base preparation.
Launch Concrete Slab Calculator →